Nutrient Deficiency & Crop Problems
How to Diagnose Nutrient Deficiency in the Field
Diagnose suspected nutrient deficiency by mapping the field pattern, recording symptom type and leaf age, checking roots and soil conditions, and confirming the likely cause with representative soil and plant tissue analysis before applying a correction.
How should nutrient deficiency be diagnosed in the field?
Diagnose suspected nutrient deficiency as a field investigation, not from one leaf symptom. Map where the problem occurs, record the affected plant parts and leaf age, describe the symptom precisely, inspect the roots and soil conditions, and review recent weather, irrigation and fertilizer history. Use these observations to narrow the possible causes, then confirm or challenge the diagnosis with representative soil and plant tissue analysis before applying a correction.
This approach is broadly applicable across crops and regions, but crop-specific sampling protocols, sufficiency ranges and fertilizer recommendations still matter. Visual symptoms are useful clues; they are not automatic proof that a particular nutrient is missing.
Why should nutrient diagnosis start with observation?
Yellow leaves, poor growth, marginal scorching and abnormal new growth can all indicate a nutrient problem, but similar symptoms can result from poor root development, unfavorable soil pH, salinity, drought, waterlogging, disease, pests or fertilizer injury.
A reliable diagnosis therefore combines several kinds of evidence:
- The spatial pattern in the field
- The plant parts and leaf ages affected
- The type and location of symptoms
- Root-zone, water and soil conditions
- Fertilizer and management history
- Soil and plant tissue analysis
The goal is not merely to name a low nutrient. It is to identify the factor limiting crop performance and select a correction that addresses the cause.
1. Start with the pattern in the field
Before examining an individual leaf, step back and look across the field. Ask:
- Is the problem affecting the whole field, individual plants, rows or patches?
- Does it follow irrigation lines, drainage areas, slopes, compacted zones or field edges?
- Did symptoms appear suddenly or develop gradually?
- Are affected plants in areas with different soil texture, moisture or fertilizer history?
- Are neighboring plants at the same growth stage showing the same symptoms?
Field patterns can separate nutritional problems from other stresses. Symptoms concentrated in wet or compacted areas may indicate restricted roots or poor aeration. Drought can restrict nutrient movement toward roots and produce symptoms that resemble a nutrient deficiency.
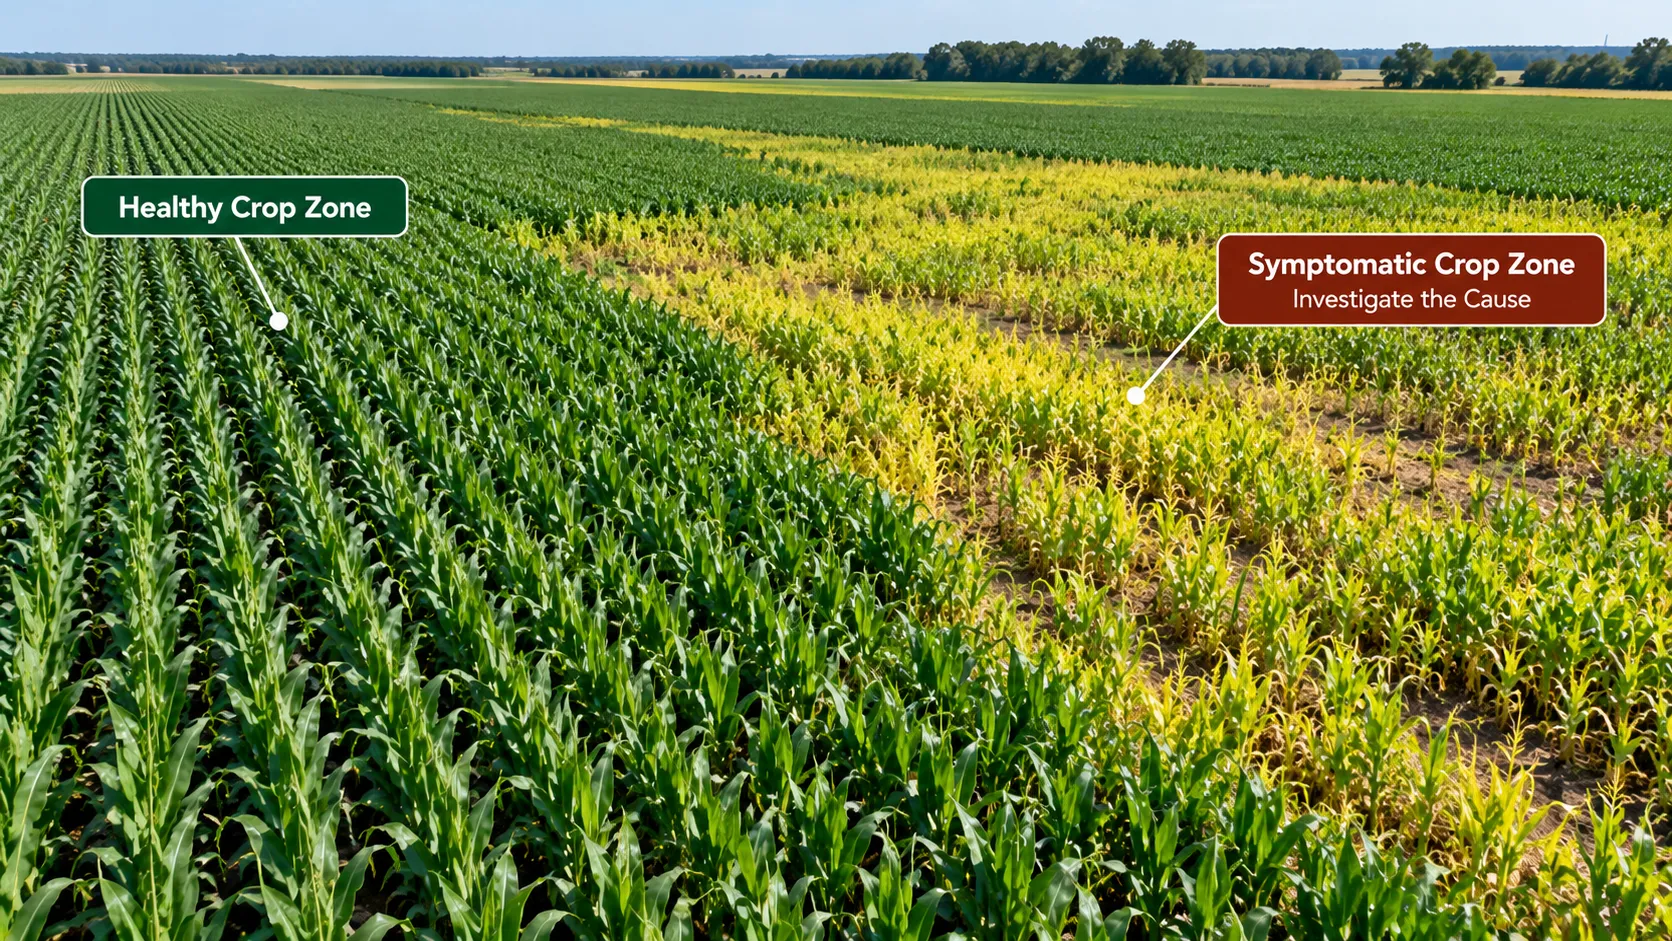
When the problem is patchy, mark healthy and symptomatic zones so they can be compared during soil and tissue sampling.
2. Examine which leaves are affected
Leaf age is one of the most useful early clues. Plants can redistribute some nutrients from older tissues to actively growing parts. When these relatively mobile nutrients become limiting, symptoms often appear first on older leaves.
Less-mobile nutrients are not redistributed as readily. Their deficiency symptoms therefore tend to appear first on younger leaves, growing points or other actively expanding tissues.
Use leaf age as a clue, not a rule. Root problems, water stress, pH, salinity, disease and nutrient interactions can create overlapping patterns.
3. Record the symptom precisely
Avoid describing a plant only as “yellow.” Record the exact appearance and location of the symptom:
- General chlorosis: an overall loss of green color
- Interveinal chlorosis: yellowing between veins while veins remain greener
- Marginal chlorosis or necrosis: yellow or dead tissue concentrated along leaf edges
- Necrotic spots: localized dead tissue
- Distorted growth: curling, malformed leaves or abnormal new growth
- Reduced growth: small leaves, short internodes, weak shoots or poor overall vigor
- Tissue age: symptoms on older leaves, younger leaves or growing points
The combination of symptom type, leaf age, plant part and field pattern is more informative than any one visual clue. If several disorders remain plausible, confirm the cause before fertilizing.
4. Use nutrient mobility to narrow the possibilities
Nutrient mobility helps explain where symptoms appear:
- Older leaves affected first: consider relatively mobile nutrients such as nitrogen, phosphorus, potassium and magnesium among the possibilities.
- Young leaves or growing points affected first: consider less-mobile nutrients such as calcium, boron, iron, manganese, zinc and copper among the possibilities.
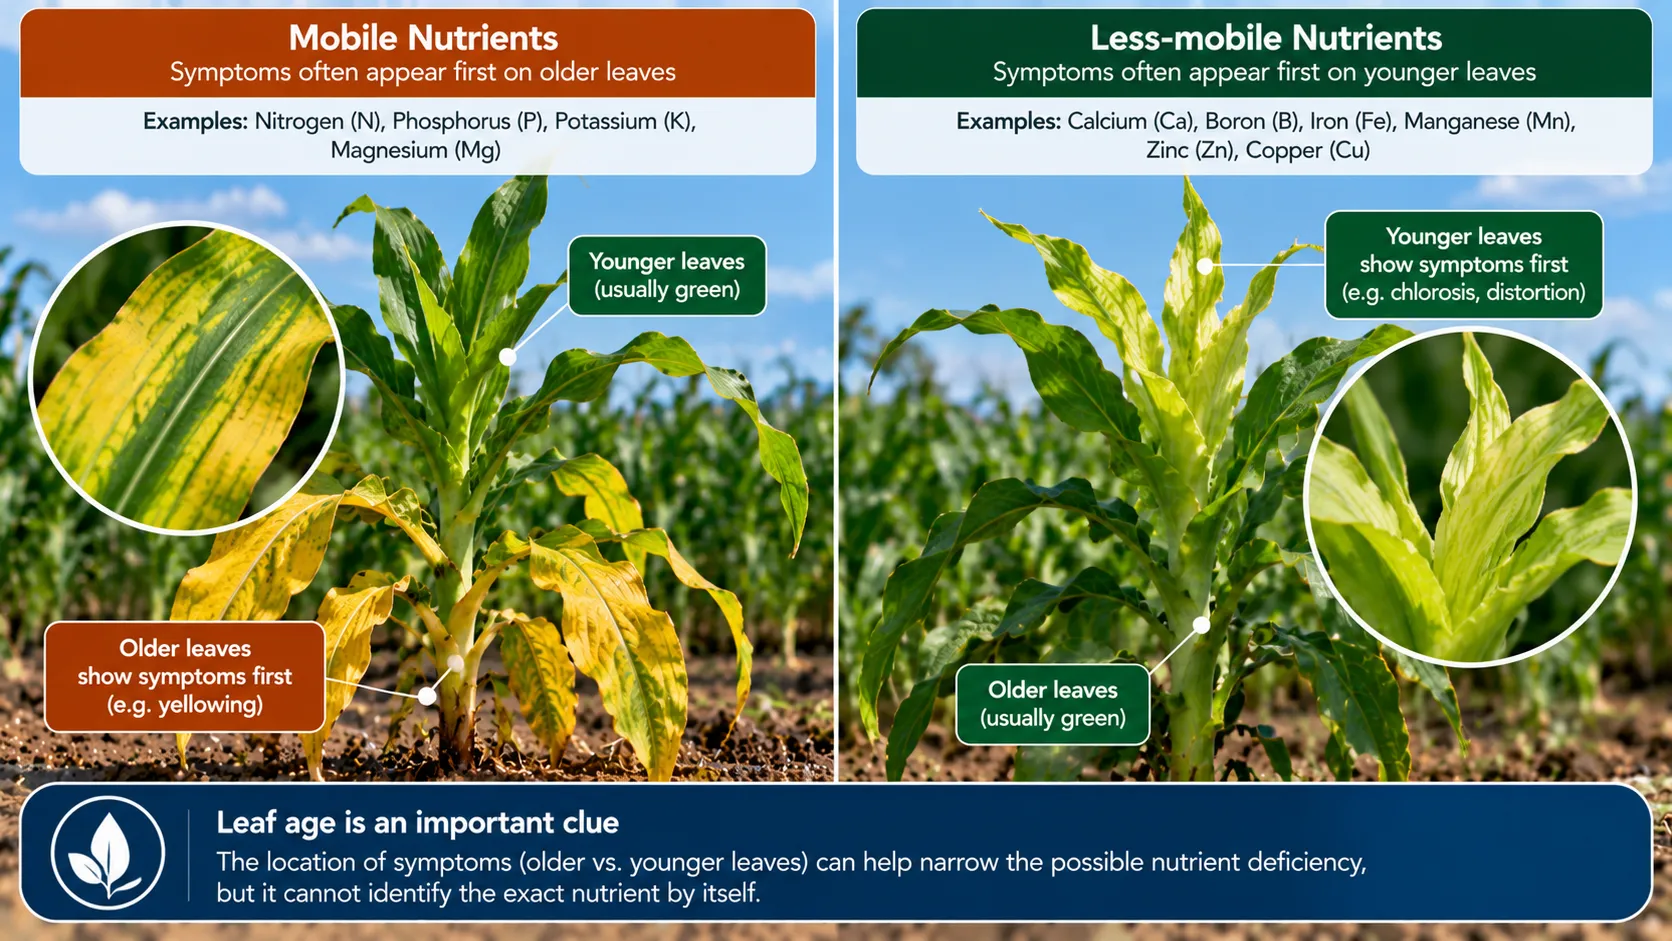
These groups are diagnostic guides, not a substitute for testing. Calcium-related symptoms, for example, can develop because water movement, transpiration or root activity limits delivery even when the soil contains calcium.
5. Check the root zone before applying more fertilizer
A crop may show deficiency symptoms even when the soil contains a reasonable amount of the nutrient. The practical question is not only “How much is present?” but also “Can the plant access and use it?”
Check:
- Soil moisture and recent irrigation or rainfall
- Compaction, poor drainage, waterlogging and restricted root growth
- Soil pH and its effect on nutrient availability
- Salinity or excessive soluble salts where relevant
- Recent fertilizer applications, placement and possible salt injury
- Root disease, nematodes or other root-zone problems
A nutrient can be present but unavailable because of chemical, physical, biological or environmental constraints. Adding more fertilizer without identifying that constraint can waste input and worsen salt or nutrient-balance problems.
6. Use soil testing to understand the root zone
Soil analysis can help assess pH, salinity, organic matter and plant-available nutrients. It is valuable when symptoms may be related to soil fertility and when planning a corrective fertilizer program.
Sampling quality determines how useful the result will be. Follow a consistent sampling plan and keep different management or problem zones separate. A sample from one poor-performing spot should not be treated as representative of an entire field.
For a patchy problem, compare a soil sample from the symptomatic zone with one from a healthy reference zone using the same depth, collection method and laboratory analysis. The soil-test interpretation guide provides a broader framework for turning laboratory measurements into a fertilizer plan.
7. Confirm crop nutrient status with plant tissue analysis
Plant tissue analysis measures nutrient concentrations in the crop itself. It is particularly useful when symptoms are unclear, hidden nutrient stress is suspected, or you need to check whether nutrients are reaching the plant.
The sample must represent the correct plant part at the correct growth stage. Nutrient concentrations change as plants develop and differ between plant tissues, so use the crop-specific protocol supplied by the laboratory or relevant agronomic authority.
- Collect a representative composite sample rather than only the most damaged plants.
- Avoid diseased, pest-damaged, dead or dying tissue when the objective is nutritional diagnosis.
- Record the crop, variety where relevant, growth stage, field zone, recent fertilizer applications and environmental conditions.
- Prevent soil or fertilizer contamination during sampling.
- Follow the laboratory’s packaging and handling instructions; avoid prolonged storage in hot, sealed conditions.
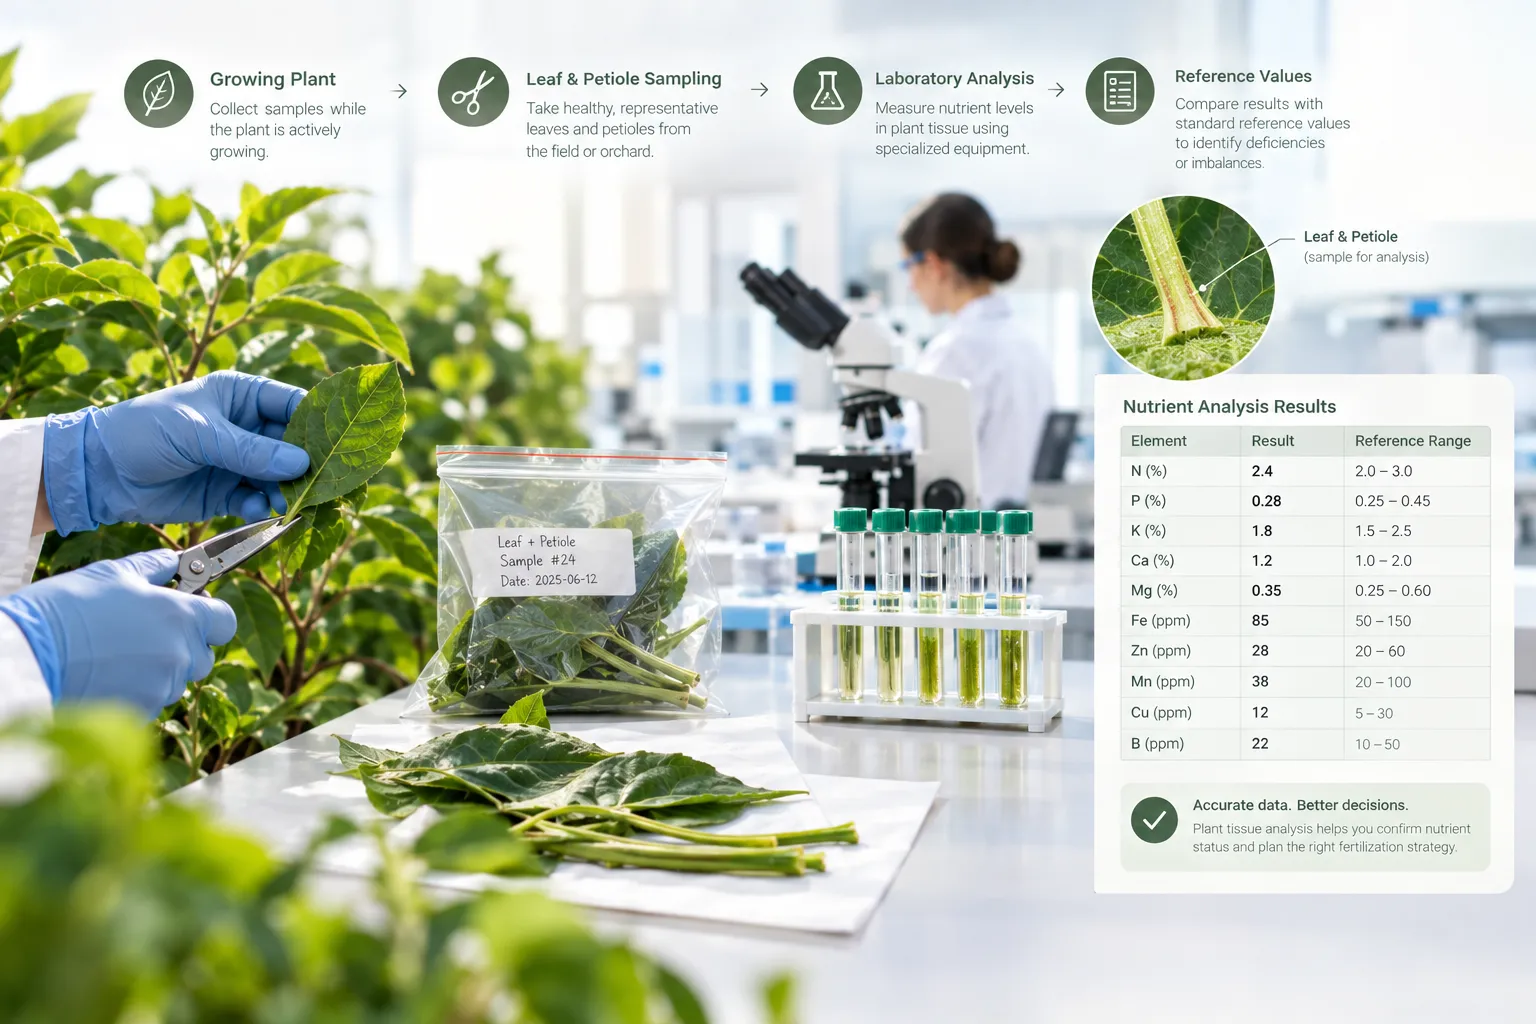
Comparative sampling can be especially powerful. Collect healthy and symptomatic samples at the same time and growth stage, label them separately and interpret the results together with soil and field observations.
8. Do not treat a low tissue value as a complete diagnosis
A tissue test is a snapshot of the nutrients present in sampled plant material. A low concentration can indicate inadequate supply, but it can also reflect restricted roots, drought, excess moisture, salinity or poor nutrient movement.
For example, if tissue potassium is low while soil potassium tests adequate, investigate root development, compaction, soil moisture and nutrient movement before automatically increasing potassium fertilizer. The task is to identify why crop uptake or delivery is limited.
9. Rule out other causes
Compare the symptoms with other common crop disorders before finalizing the diagnosis:
- Water stress: drought and waterlogging can restrict nutrient uptake.
- Root problems: compaction, disease, nematodes and poor aeration can reduce uptake.
- Soil pH: unfavorable pH can limit availability even when total nutrient content is adequate.
- Salinity: excessive salts can interfere with water uptake and nutrient balance.
- Pests and diseases: damage may resemble a nutrient disorder or occur at the same time.
- Fertilizer injury: excessive concentration or poor placement can damage leaves and roots.
If the field pattern and symptoms do not fit a straightforward deficiency, consult a qualified agronomist, crop adviser, plant pathology service or diagnostic laboratory before treatment.
10. Follow a repeatable field diagnosis workflow
- Observe: Photograph the crop and record which plants, leaves and growth points are affected.
- Map: Mark whether symptoms are uniform or associated with field zones, irrigation, drainage or soil conditions.
- Compare: Compare affected plants with healthy plants at the same growth stage.
- Classify: Record symptom type, leaf age and whether mobility offers a useful clue.
- Inspect roots and soil: Check moisture, compaction, drainage, salinity, pH history and root health where practical.
- Test soil: Collect representative samples to evaluate nutrient availability and root-zone conditions.
- Test tissue: Use the correct plant part, timing and handling protocol when tissue analysis is appropriate.
- Diagnose the cause: Combine observations and laboratory evidence instead of relying on a single indicator.
- Correct: Apply the nutritional or agronomic correction supported by the diagnosis.
- Monitor: Recheck crop response and document the outcome for future nutrient management.
Common mistakes in nutrient deficiency diagnosis
- Diagnosing a nutrient from one leaf without checking the field pattern
- Assuming every yellow leaf indicates nitrogen deficiency
- Ignoring leaf age and nutrient mobility
- Applying fertilizer before checking moisture, roots, pH or salinity
- Sampling only the most severely damaged plants
- Using the wrong plant part or growth stage for tissue testing
- Interpreting a laboratory number without field context
- Treating a low tissue value as proof that more fertilizer is always required
- Waiting for severe visual symptoms before monitoring crop nutrition
What is hidden hunger?
Not every nutrient problem produces an obvious visual symptom. A crop can have nutrient concentrations below the level required for optimum performance while still looking relatively healthy. This is often described as hidden hunger.
Routine tissue testing can help detect these situations before symptoms become severe. In high-value crops, monitoring can therefore support preventive crop management as well as problem diagnosis.
Diagnose before you fertilize
Nutrient deficiency diagnosis is most reliable when visual observations, field patterns, root-zone checks, soil testing and plant tissue analysis are used together. Symptoms indicate where to look, nutrient mobility narrows the possibilities, and laboratory analysis helps confirm crop and soil conditions.
Do not treat the symptom before understanding the cause. A nutrient may be present in the soil but unavailable to the plant, and a low tissue value may result from restricted roots, water stress or another environmental limitation. Better diagnosis supports more efficient fertilizer decisions.
Nutrexia develops fertilizer solutions for efficient and reliable crop nutrition. If you are evaluating a nutrient deficiency or planning a crop nutrition program, contact the Nutrexia team with information about the crop, growth stage, soil and water conditions, field pattern and available test results.
Scientific basis and further reading
- Penn State Extension. Mid-Season Crop Tissue Testing. Guidance on hidden hunger, crop stage, plant part, representative sampling and interpretation.
- University of Minnesota Extension. Plant tissue analysis: What to know about sampling strategy and handling. Guidance on timing, comparative sampling, contamination and handling.
- University of Minnesota Extension. Testing and analysis. Overview of plant and soil sampling as complementary diagnostic tools.
- UC Agriculture and Natural Resources. Meet Crop Nutrient Requirements. Guidance on soil testing, tissue analysis, symptoms and water-related factors.
- UF/IFAS Extension. Plant Tissue Analysis and Interpretation for Vegetable Crops in Florida. Crop-specific background on sampling, nutrient mobility, interpretation and fertilizer management.
Frequently asked questions
Can a visual symptom identify the exact nutrient deficiency?
Usually not by itself. Leaf age, symptom type and field pattern can narrow the possibilities, but water stress, root damage, soil pH, salinity, pests, disease and fertilizer injury can produce similar symptoms. Confirm the diagnosis with field history, root-zone checks and appropriate soil or tissue analysis.
Why do some nutrient deficiencies appear first on older leaves?
Plants can redistribute relatively mobile nutrients from older tissues to active growth. When supply becomes limiting, older leaves may therefore show symptoms first. Nitrogen, phosphorus, potassium and magnesium are commonly used as examples, but the pattern is a clue rather than proof of a specific deficiency.
Why do some nutrient deficiencies appear first on younger leaves?
Less-mobile nutrients are not readily redistributed from mature tissues to new growth. Calcium, boron, iron, manganese, zinc and copper are commonly considered when young leaves or growing points are affected, but root, water and environmental conditions must also be checked.
Should soil and tissue samples be taken from both healthy and symptomatic areas?
Comparative sampling can be very useful when the field problem is patchy. Sample healthy and symptomatic zones separately at the same growth stage, follow the same laboratory method, and use the crop-specific protocol for plant part, sample size and handling.
Does a low tissue-test result always mean more fertilizer is needed?
No. A low tissue concentration can reflect inadequate supply, but it can also result from drought, waterlogging, restricted roots, compaction, salinity or poor nutrient movement. Interpret tissue results together with soil results and field observations before choosing a correction.
About the agronomist

Somayeh Soroush
Plant & Horticultural Expert · Nutrexia R&D Specialist
From productive gardens to advanced greenhouse systems, Somayeh Soroush works where practical horticulture meets modern plant nutrition. She supports progressive growers and greenhouse teams across the Middle East, translating Nutrexia's research into clear, field-ready guidance for diverse crops and growing conditions.
Reviewed by: Somayeh Soroush